

Любой автовладелец сталкивался с ситуацией, когда требовалось прокачать тормоза. И если с простой тормозной системой сложностей почти никогда не возникает, то прокачка тормозов с АБС многих настораживает и даже пугает.
Необходимость прокачки тормозов с АБС
Тем не менее, антиблокировочная система сейчас чрезвычайно распространена, а практически все автоконцерны включают ее в перечень штатного оборудования даже на бюджетных моделях. Следовательно, навыки прокачки тормозной системы такого типа решительно необходимы.
Anti-lock braking system – вспомогательная система, назначением которой является исключение блокировки колес автомобиля в процессе торможения. Достигается это за счет перемены показателей давления в тормозных механизмах. Ее функционирование не позволяет машине уйти в занос во время резкого торможения.
Основными элементами данной системы являются:
-
ЭБУ – блок управления ориентируется на поступающие от датчиков сигналы, на основании которых и производит регулировку работы клапанов;

Электронный блок управления

Датчики системы АБС

Клапаны управления в системе АБС
Как прокачать тормоза с АБС
Прокачка тормозов с АБС возможна одним из 3-х путей, причем их реализация зависит от конструкции всего комплекса:
- Свои силы – подобный метод можно реализовать только тогда, когда блок клапанов смонтирован вместе с гидроаккумулятором. В этом случае владельцу потребуется только деактивировать всю систему, для чего вынимается предохранитель. Далее процесс прокачки аналогичен тому, который осуществляется в случае с простой тормозной системой.
- Использование диагностического сканера – применение такого устройства необходимо, если гидроаккумулятор и гидромодуль (с клапанами) располагаются в разных точках. В данном случае сканер отвечает за считывание данных с блока управления. Теоретически, все это реально осуществить и самостоятельно, однако подобная аппаратура недешева и у обычных автовладельцев встречается крайне редко, а обращение с ней требует знаний и опыта. Следовательно, гораздо разумнее отогнать машину на СТО;
- Автосервис – нередко в автомобилях ABS сблокирована с электронной системой SBC (ESP). В этом случае прокачать тормоза сможет только мастер.
Для работы необходим напарник. Сначала покачивается левое переднее колесо, затем правое, после чего левое заднее колесо и, в завершении, правое заднее.
Подготовка к работе
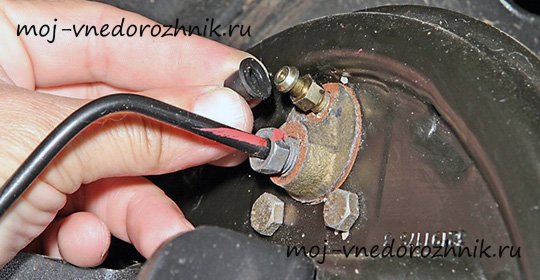
Изначально требуется проинспектировать состояние резьбового соединения на штуцере прокачки. Нередко коррозия прихватывает ее намертво. Не лишним будет заблаговременно (за пару часов) щедро обработать металл составом WD-40. Если же и в этом случае открутить не получится, придется ехать на СТО, чтобы не сорвать резьбу. Кроме того, сначала нужно сделать отметку на поверхности расширительного бачка, дабы зафиксировать текущий уровень жидкости. Данный ориентир необходим, чтобы впоследствии не залить в бачок излишек. Затем разъединяются штекера системы ABS. После этого можно откручивать крышку и приступать к работе.
Видео: ABS. Руководство TOYOTA
Прокачка тормозов с АБС
В идеале машину лучше загнать на яму или эстакаду, но при отсутствии таковой, можно просто откручивать нужное колесо. Затем подготовленный заранее шланг (обязательно прозрачный) необходимо надеть на штуцер тормозного цилиндра, после чего второй его конец опустить в емкость, подготовленную заблаговременно. Рычаг КПП нужно зафиксировать в положении N, натянуть «ручник» и включить зажигание, чтобы постепенно сбросить имеющееся в системе давление, которое может достигать отметки в 180 атмосфер! Естественно, работать в условиях такого давления просто невозможно.
Затем помощнику требуется сесть за руль и постоянно нажимать на педаль тормоза, пока он не начнет ощущать сопротивление. При образовании такового педаль нужно нажать и удерживать. В это время требуется отвернуть ключом штуцер. Когда педаль упрется в пол, его нужно обратно завернуть. Затем помощнику разрешено отпустить педаль.
Продолжать подобные действие необходимо, пока уровень жидкости в расширительном бачке не упадет до патрубка гидропривода. Нужно помнить и о периодической доливке в расширительный бачок свежей тормозной жидкости. В противном случае внутрь тормозной системы может попасть воздух. По окончании штуцер следует закрутить обратно.
Видео: Антиблокировочная система тормозов
Ликвидация воздуха в системе
Он скапливается в гидроприводе сцепления. Стоит учесть, что во время его выкачивания начнет выливаться и тормозная жидкость – около 100 мл. Это значит, что по окончании процедуры в бачок потребуется заново долить жидкость, дойдя до максимальной отметки.
Продолжение работы
После окончания прокачки в переднем левом суппорте, требуется реализовать аналогичные действия в остальных цилиндрах. Необходимо отметить, что прокачка тормозов с АБС будет связана с инспекцией вытекающей из цилиндров тормозной жидкости. Ее примерный объем для каждого суппорта должен составлять около 250 мл. Главное – в этой жидкости недопустимо содержание пузырей воздуха. Завершение работ отмечается проверкой свободного хода тормозной педали. При условии качественно проведенной прокачки, свободный ход не должен превышать 30% от общей длины амплитуды педали.
Окончание

Прокачка тормозов с АБС
На финише потребуется долить свежую тормозную жидкость в бачок. При этом необходимо будет ориентироваться на сделанные ранее отметки. Затем нужно плотно завинтить крышку и вновь соединить штекера системы АБС.
Прочее
После завершения прокачки настоятельно рекомендуется проинспектировать иные элементы тормозной системы, дабы убедиться в ее полной герметичности.
Для этого потребуется проверить все соединения тормозных шлангов, а также качество фиксации хомутов. Не помешает еще раз убедиться в наличии нужного уровня жидкости в бачке.
Поверка
По окончании работ нужно завести мотор, после чего нажать до упора на педаль тормоза, удерживая ее в таком положении порядка 10 сек. На приборной панели лампочка ABS должна загореться для самодиагностики и через несколько секунд погаснуть. Это гарантирует отсутствие электронных ошибок, а еще гарантирует, что прокачка тормозов с АБС прошла успешно.
В качестве финишной проверки осуществляется заезд с периодическим торможением. При этом хотя бы единожды требуется зажать педаль тормоза до полно остановки автомобиля. Во время торможения должна чувствоваться пульсация в педали.
How to check the car generator yourself reference 1
How to test the DMRV with one’s own hands reference 2
Bleeding the brakes with ABS taking into account system features ↑
Bleeding the braking system has never been something very difficult and problematic for motorists, doing this work took an average of 1.5-2 hours. However, with the advent of cars with the ABS system, the task has become much more complicated, and the question of how to brake brakes from ABS is that most drivers can not answer. Therefore, pumping the brake system with ABS will require you to have some technical skills. In addition, it will not be superfluous to pre-examine the manual for the installation and maintenance of your car’s brake system.
The process of bleeding the braking system with ABS can not be called time consuming or complicated, the whole problem is that you need to know the sequence of doing this work and then everything will turn out.
Features of bleeding ABS brakes :
• in cars that have a hydraulic valve, a hydraulic accumulator and a pump in one unit, a brake fluid replacement and bleeding of the brake system with ABS is performed similarly to pumping the brakes on a car without ABS
To pump this braking system to the ABS, do the following:
1. Locate the fuse that is responsible for the operation of the entire ABS system and remove it from the socket. This will turn off the system completely.
2. Unscrew the RTC choke (service brake cylinder) and proceed to bleeding
3. Prorolling of brakes with ABS is performed with the pedal depressed, to check the action, switch on the ignition, the ABS fault indicator on the instrument panel will light up. (Do not unscrew the union with the brake pedal released)
4. Turn the ignition on and wait for the pump to completely expel the air from the system.
5. The bleeder is tightened and the brake pedal is released
6. The bleed screw is tightened and the brake pedal is released
7. When the light goes out — this will mean that the system is correctly pumped.
• Bleeding the brake system with ABS in which the hydronic module with valves and the accumulator are separated by separate units is carried out using a diagnostic scanner to remove information from the ABS computer. It is unlikely you have it. Therefore, the pumping of brakes with ABS of this type is most likely to be carried out by you in the service station.
• Bleeding the brake system with ABS and with electronic activation systems (ESP or SBC) is performed only under service conditions.
However, how do I pump the brakes with this ABS? ↑
It is important! It should be remembered that the pressure in the braking system reaches 180 atm. Therefore, to exclude the ejection of the brake fluid, before disconnecting the brake lines of any system with ABS, it is necessary to discharge the pressure accumulator. For this, with the ignition off, press 20 times the brake pedal.
Brake system with ABS
Bleeding the brakes with ABS, as well as pumping the conventional braking system, is performed with an assistant. Switch off the ignition (position "0"). Disconnect the connectors on the brake fluid reservoir.
Front wheel brakes:
Ignition OFF
• put the hose on the bleeder;
• Open the choke for a turn;
• the brake pedal is pressed to the stop and held in the squeezed position;
• observe the output of the "air-blown" mixture;
• When the bubbles run out, tighten the nipple and release the pedal.
Rear right wheel brake :
• put the hose on the bleeder, unscrew it for one turn;
• Press the brake pedal all the way
• Switch on the ignition, do not release the brake pedal
• A working pump will expel air from the system. That is, as soon as the brake fluid starts to exit without air bubbles, block the union and release the brake.
Now it’s the turn to pump Left rear wheel brake
• put the hose on the union and unscrew it for 1 turn;
• DO NOT depress the brake pedal;
• the working pump pushes the "air-blown" mixture;
• Press the brake pedal halfway and tighten the fitting;
• Release the pedal and wait for the pump to stop completely.
• Switch off the ignition, connect the connectors to the tank TG.
On completion, check for leaks, make sure the brake system is sealed. Add the brake fluid to the tank to the required level. This pumping brake with ABS can be considered complete. Assemble the tool, wash your hands and check the operation of the brakes in motion. Be careful, do not overclock fast, first check the brakes at low speed.
ABS: WHY IT NEEDS
It is known that if the front wheels are blocked during emergency braking "on the floor", the car becomes uncontrollable. Turning the steering wheel in this case is completely useless. Experienced driver brakes intermittently, letting the wheels turn, which allows you to taxi in the right direction and, maybe, drive around the unexpectedly encountered obstacle. But do many of us have enough self-control even for a moment to ease the pressure on the brake pedal, when the car with a squeal flies, perhaps, in its final path?

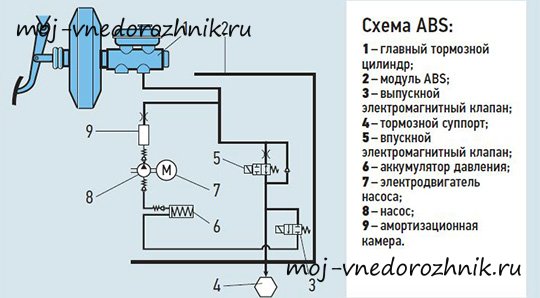
Fig. 1. Functional diagram of ABS Teves Mk II: 1 — hydraulic pump; 2 — pressure accumulator; 3 — ECU; 4 — wheel sensors; 5 — the block of electromagnetic hydrovalves.
What is difficult for a person is beyond the power of impassive electronics. And already on the blocking of the wheels the pedal responds with frequent sharp jerks, which shows: ABS works, and now you have the opportunity to turn away from danger!
ABS: HOW IT DONE
In Fig. 1 shows the functional diagram of a typical ABS. We immediately pay attention to the electric pump 1 and the pressure accumulator 2: these components are necessary for intelligent electronics to be able to control the braking force regardless of the reaction of the driver (recall — in an emergency, it usually just presses the pedal "to the stop"). In addition, the electronic control unit 3 (ECU) must "know" whether the wheels are rotating at this time and at what speed. This information is provided by the sensors 4, which control each wheel. After all, there may be a situation where a slippery road surface under one of the wheels provokes its early blockage. Then the ECU, at the signal from this wheel, issues a command to loosen the braking force, preventing skidding and turning the car. True, while the stopping distance will be as if all the wheels were on a slippery road. But the developers believe that it is more important in any case to maintain controllability and maneuverability.
The last of the ABS assemblies is a block of electromagnetic valves 5, which, in fact, control the fluid pressure. In each of the circuits of the brake system, two valves are provided — the inlet valve, which opens the way of the liquid from the pressure accumulator to the working cylinder, when it is necessary to increase the braking force, and the outlet that allows the liquid to go back to the tank when the pressure has to be relaxed. These valves with a working ABS either open alternately, or closed, if the pressure in the circuit should remain unchanged. Finally, it is important to know that in the de-energized state, the intake valves are open, and the exhaust valves are closed. This allows the ABS to simply turn it off (for example, by removing the fuse F54 (Figure 2) or removing the connector from the computer) and braking, as in a conventional car.
ABS: IN CASE AND IN DISEASE
A schematic diagram of the ABS joints of the Teves company installed, in particular, on the Volkswagen-Passat cars of the 1990 release as additional equipment, is shown in Fig. 2. As you can see, it is not too complicated. And nevertheless, it is worthwhile to make some important remarks for those who dare to repair ABS themselves.
1. Before removing the battery and carrying out welding work on the vehicle, be sure to disconnect the plug connector from the ABS computer with the ignition off. This block in the "Passat" is located under the pillow of the rear seat.
2. When performing painting work, the computer should not be exposed to a temperature of 85 ° C for more than two hours.
3. Before any work on the brake system, discharge the pressure accumulator by pressing the brake pedal at least 20 times with the ignition off, otherwise the system will retain a pressure of about 180 atm.
4. Be careful, including ignition when the hydraulic system is depressurized, as in this case the brake fluid pump will work.
Now let’s start checking the ABS nodes. For workers of service centers, readers are issued that allow you to remove information from the self-diagnosis system. The thing is expensive and almost inaccessible to car enthusiasts. We will dispense with the usual radio amateur tester, which measures the voltage and resistance in electrical circuits. Connect the leads of the device to the contacts of the computer connector, which requires accuracy and skill. Therefore, most of the checks will be performed with the ignition off and the computer connector removed, then the tester can be easily connected to the pins of the pad on the wiring harness. So, we study the ABS test table.
Let’s explain the rules of using the table. Measure the voltage or resistance between the terminals of the computer in the second column of the connector of the computer-ABS in the terminal block located on the wiring harness. In this case only pp. 35-40 check with the computer connected, otherwise the connector is removed. The last column indicates the possible cause of the malfunction if the measurement results do not correspond to those indicated in the fifth column. In this case, we consider only the cases of defects in the nodes of the system, assuming that the electronic unit is functional. This is all the more justifiable, that the repair of the computer in the home is impossible, and it is entirely possible to replace a whole assembly with a handy and sharp-witted motorist. If you do everything correctly, then the ABS warning lamp on the instrument panel will go off after a short time after the ignition is switched on — as it should be with a working system.
Which electrical circuit corresponds to reality, I can not say (did not penetrate)
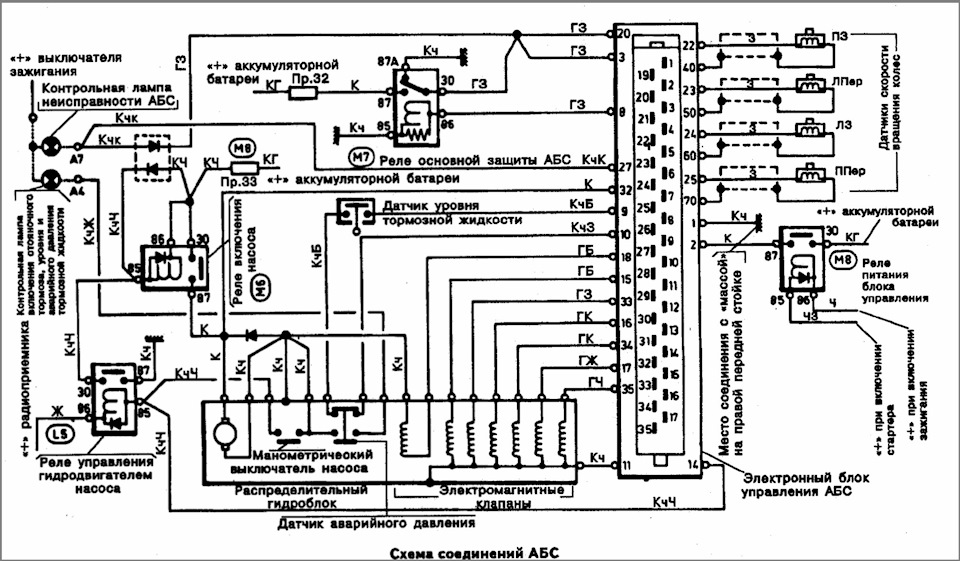
Fig. 2. Schematic circuit diagram of ABS connections Teves Mk II. The notation from the Latin letter and number (for example, W / 2 or U2 / 10) indicates the connector in the fuse and relay block (letter) and its contact (figure). The figure near the point of connection with the "mass" shows the location of this connection in the car (22 — on the hydraulic unit, 28 — on the engine compartment partition, 39 — under the pillow of the rear seat on the left). Fuses 53 and 54 are installed directly under the corresponding relays above the main part of the relay and fuse block. The numbering of non-ABS units corresponds to the Volkswagen-Passat scheme in the RA, 1998, No. 10.
And in conclusion — several recommendations for replacing the nodes. Let us reiterate that before releasing the hydraulic system it is necessary to relieve the pressure in its accumulator by pressing the brake pedal 20 times with the ignition off. The pumping of the circuits connected to the pump has its own peculiarities. So, you put a transparent tube on the choke and lowered its end into a jar with brake fluid. Now press the brake pedal, unscrew the bleeder and turn on the ignition. This will turn on the ABS pump, which will expel air from the system. As soon as the bubbles cease to emerge, release the pedal, tighten the connection and turn off the ignition.
Before installing the new wheel rotation sensor, apply a layer of grease to the surface of the seat and install a new O-ring.
Of course, the ABS of other models is different from the one described above and the fault table to them may not be suitable. But the general principles of building systems are the same, and if you can find an ABS scheme for your machine, then, comparing it with Fig. 2, it is also easy to correct the diagnostic table. Therefore, our recommendations, we hope, will be useful in any case.
В процессе ремонта в тормозную систему зачастую попадает воздух (это происходит при потере конструкцией герметичности, замене тормозной жидкости и пр.). Понять, что есть излишек воздуха, можно по мягкому и увеличенному ходу педали. Избавиться от него поможет прокачка тормозов.
Многие автомобили оборудованы системой ABS: прокачка подобной системы будет иметь определенные особенности.

Устройство системы ABS
До того, как приступить к работам, стоит ознакомиться с общим устройством антиблокировочной системы.
Она состоит из следующих составных частей:
- датчиков скорости;
- клапанов, являющихся модуляторами движения (находятся в магистрали тормозной системы);
- главного блока управления, обрабатывающего информацию, поступающую от датчиков, и регулирующего работу клапанов путем уменьшения или увеличения тормозного давления.
Как правильно прокачать тормоза с АБС
Перед началом процедуры нужно определить, какой именно разновидностью АБС оборудовано транспортное средство.
Первый возможный вариант – расположение составных элементов конструкции (насоса, аккумулятора, клапанов) в одном месте. Это наиболее простая схема, вследствие чего прокачка тормозов с АБС вполне может быть осуществлена самостоятельно.
Порядок действий будет следующим:
- Найти предохранитель, обеспечивающий исправное функционирование системы, и вынуть его из гнезда.
- Вывинтить прокачивающий цилиндр штуцер.
- Завести автомобиль, нажав тормозную педаль (при этом на панели обязательно должна загореться лампочка ABS).
- Запустить насос, дождаться, когда воздух выйдет.
- Если лампочка перестала гореть, завершить процедуру (погасший индикатор будет свидетельствовать о том, что всё сделано верно).
Как прокачать тормоза с АБС, если узлы размещены не в одном месте? Выполнение этой операции потребует наличия дорогостоящего устройства (сканера), считывающего данные, поступающие с блока ABS, поэтому если его нет, логично будет сразу обратиться в специализированный сервис, что обойдется намного дешевле.
Правильная прокачка тормозов с АБС второго типа тоже осуществляется в определенной последовательности (необходимо понимать, что представленная ниже инструкция представляет собой общие рекомендации, которые могут различаться для разных моделей автомобилей).
Для начала следует уменьшить давление: выключается зажигание, затем педаль тормоза нажимается примерно 15 раз, далее отключаются разъёмы на ёмкости с тормозной жидкостью.
Прокачка начинается с передних колес авто:
- на штуцер надевается шланг (это обязательно делается при заглушенном двигателе), после чего он открывается на 1/2 оборота;
- выжимается и фиксируется педаль газа (тормозная жидкость должна начать выходить наружу с образованием пузырьков);
- после прекращения появления пузырьков прокачной штуцер плотно закручивается.
Тормоза на задних колесах будут прокачиваться по отдельности.
Сначала правое колесо:
- на открученный полностью штуцер надевается шланг;
- тормозная педаль выжимается и включается зажигание;
- начавший работать насос избавит систему от скопившегося в ней воздуха (процедуру пора прекращать, если пузырьки в выходящей жидкости отсутствуют).
Для регулировки тормозов левого заднего колеса действовать необходимо таким образом:
- надеть на штуцер шланг, вывернуть его на целый оборот;
- не трогать тормоз;
- запустившийся насос начинает выкачивать тормозную жидкость с примесями воздуха;
- нажать тормозную педаль примерно наполовину;
- завинтить штуцер;
- отжать педаль;
- после полной остановки насоса подсоединить разъемы к емкости с топливной жидкостью.
Как прокачать тормоза с ABS, чтобы не бояться за собственную безопасность? Для этого после завершения работ надо убедиться, что система герметична, а подтекания отсутствуют. Залив тормозную жидкость до требуемого уровня, стоит протестировать тормоза: не рекомендуется сразу сильно разгоняться – лучше для начала проверить работу тормозной системы на небольшой скорости.